Thursday, July 26, 2012

Surna Ghashi / Yam in a Konkani style coconut masala

Rice is a staple in Mangalorean cuisine. Rotis were never really part of it. Its a more recent addition, with people adapting to food from different cultures or switched over from rice, for health reasons.

To go with rice, there is always a simple dali saar or the Mangalorean favourite - coconut based curries with sprouts or vegetables. Kadi, tambli or a lighter saar.
A favourite among these coconut based curries is the ghashi (gha-she)

soorna ghashi

Ghashis can be made using different legumes, vegetables or even fish. This time I tried a yam / surna ghashi and it turned out really good.

In Konkani cooking, there are slight variations in the ingredients that go into the masala, and then it turns into a new dish with a new name ! To make an 'ambat', skip the coriander seeds and add fenugreek / methi seeds instead. The seasoning is with fried onions in this case.

Yam / Surna ghashi

What you need -

100-125 gm yam / 1 cup chopped yam
3-4 garlic cloves
3 tsp coriander seeds
1/2 cup grated fresh coconut
1/2 tsp turmeric powder
1 tsp tamarind paste or a small ball of tamarind
4-5 red chillies
oil
salt to taste

What you do with it -

Cut the skin off the yam, chop into bite size pieces and place in a colander under running water. Do not touch the yam while cleaning it, it can give you a bad rash
Drain and add a tsp of salt and cover with water, allow it to steam and cook. Do not let it get too soft.
Fry the red chillies and coriander seeds in a tsp of oil and set aside
Grind the grated coconut, turmeric powder, tamarind along with the friend coriander and red chillies, to a smooth paste
Add this to the cooked yam (along with the water) and bring it to a boil
Fry the garlic in oil and add it to the yam ghashi
If you don't want to use garlic, you can give it a seasoning of mustard seeds and curry leaves
Serve hot with rice

Thursday, July 19, 2012

Baked Doughnuts


For many years during my childhood, baking always meant a nice little home made chocolate cake. Ma had a standard fail-proof chocolate cake recipe that always worked well... I remember her making it in a gas-top oven and we filled sand in a plate at the bottom of the oven. Slowly the electric oven replaced it and we perhaps experimented with some variations, but almost always stuck to cake when it came to baking.

Pizza bases, bread, cupcakes were always something we bought out, I don't think we ever felt the need to bother making it ourselves, when it was always so easily available off the shelf...All this until I started reading food blogs and eventually started this one...Okay, I don't bake that much, but I definitely attempt baking a whole lot more than cakes now.

baked doughnuts with toppings

Doughnuts were something I first had at Hot Breads, the first cool looking bakery that opened up many years back in Bangalore...Chocolate coated doughnuts that looked absolutely delicious ! That was our special treat when Ma and me went shopping on Commercial street...

I was super excited when I tried baking these at home, didn't want fried ones, so used Aparna's recipe for the doughnuts, but baked them instead

I had attempted making these a couple of months back, and had a problem with the size of the doughnuts. It took forever, trying to bake these in my small oven.
This time around, it turned out much better. I bought this mini doughnut cutter when I was in Bangalore last time and the little doughnuts shaped up really well

baked doughnuts

I did have a some apprehensions about how the baked ones would taste, but I really needn't have worried. They were really soft and delicious. I made two topping for these doughnuts, I glazed the doughnuts with some warm butter and then pressed it down on a mix of cinnamon, vanilla sugar and dessicated coconut.

doughnuts with cinnamon and coconut

I did a chocolate topping with some sprinkles for the kids. I was a bit lazy and did not want to make the chocolate glaze, when I had this box of chocolate icing from my lamingtons. The chocolate was dripping off the sides, not that the kids complained, but just that it doesn't look so neat

chocolate coated doughnuts

This goes to Susan's Yeastspotting

Baked Doughnuts
Adapted from My Diverse kitchen

What you need -

5 cups APF / maida
1.5 cups milk
1/3 cup butter
2.5 tsp instant yeast (Gloripan / angel)
1 egg
1/4 cup granulated sugar
1 tsp salt

Coating
2 tbsp melted butter
1/2 cup dessicated coconut
2 tbsp vanilla sugar
2 tsp cinnamon powder

For the chocolate topping, I used the chocolate icing remaining from the lamingtons, which was not such a great idea. Check here for Aparna's beautiful chocolate glaze

What you do with it -

Warm the milk in a pan, keep two tablespoons of milk aside and add the butter to the rest and allow it to melt.
Sprinkle the yeast over the milk and then add it to the milk-butter mixture
In a large bowl, beat the egg and add it along with the sugar and salt to the milk-butter mixture
Add about 2.5 cups of the flour to this and mix well using a spatula, till the flour is incorporated
Add 2 more cups of flour and mix well. If the dough is too sticky, add little more flour and mix well. I used about 4.5 cups of flour for the dough.
Dust your palms with flour, and shape the dough into a ball. Keep in a greased bowl and allow it to rise for about 1 1/2 hours.Place the risen dough in the fridge for another hour or so till it is almost double in volume.
Dust your work surface with flour and place about quarter of the dough on it. Roll it out using a rolling pin and till it is about 1/2" thick. Use the cutter and cut out as many as you can from that dough. Repeat with the remaining dough
Pre heat the oven to 190 C. Place the doughnuts on a lightly greased butter paper and bake for 10-12 mins.
Allow to cool and then glaze them
Mix the dessicated coconut, cinnamon powder and vanilla sugar well and spread in a plate
Brush the doughnuts with some melted butter and then press it on the coconut-cinnamon-sugar topping
Goes great with some hot coffee or tea.

Tuesday, July 17, 2012

Lamingtons

I had never heard of Lamingtons till SJ mentioned making them for a bake sale in Chennai ! The food blogger / foodie groups in Chennai, Bangalore, Mumbai and Delhi seem to be very active, making me miss my good old Bangalore even more.

lamingtons

I looked them up on David Lebovitz's site and they seemed easy enough. Knowing TH's love for chocolate, I decided on making these for his birthday a week back.
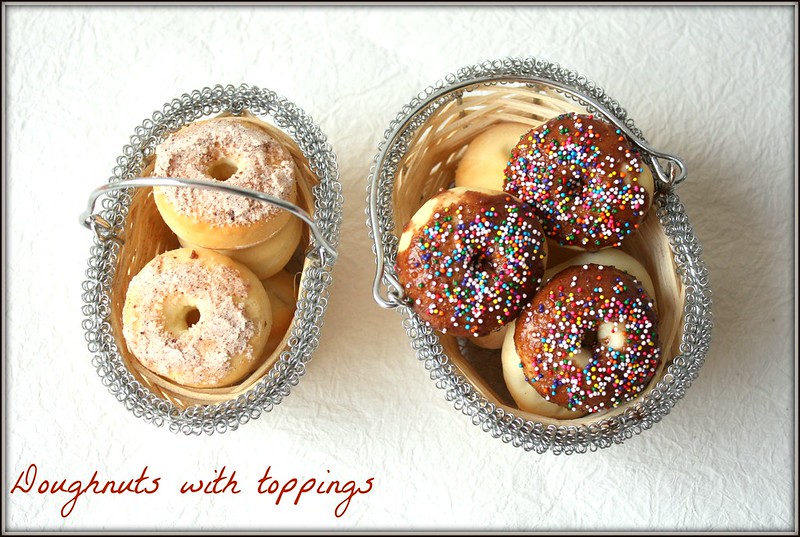
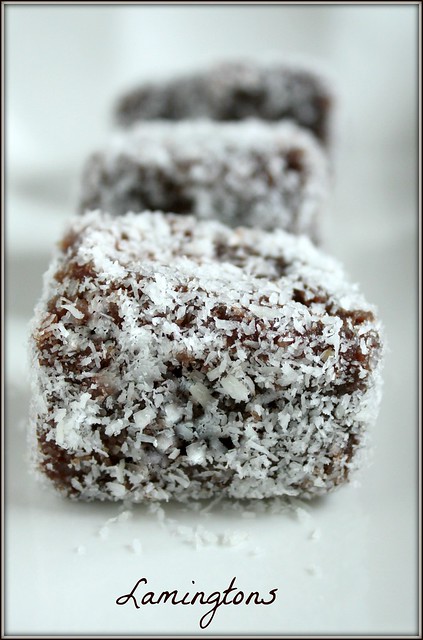
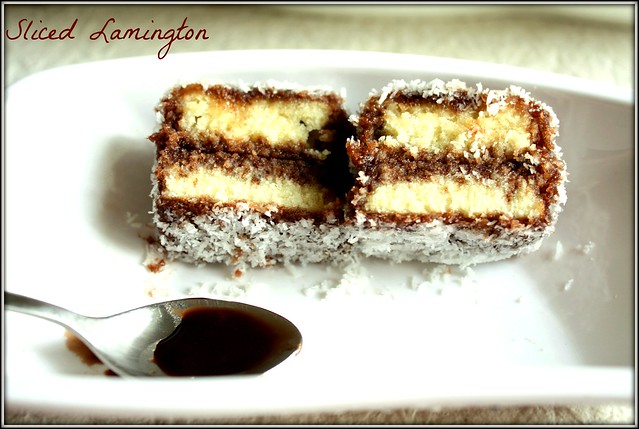
Lamingtons are originally from Australian. They are basically little cuboid shaped sponge cake pieces dipped in chocolate icing and then rolled in coconut flakes. They may have a cream or jam filling, but Lebovitz used chocolate there again and that looked like the most tempting option.

lamington sliced

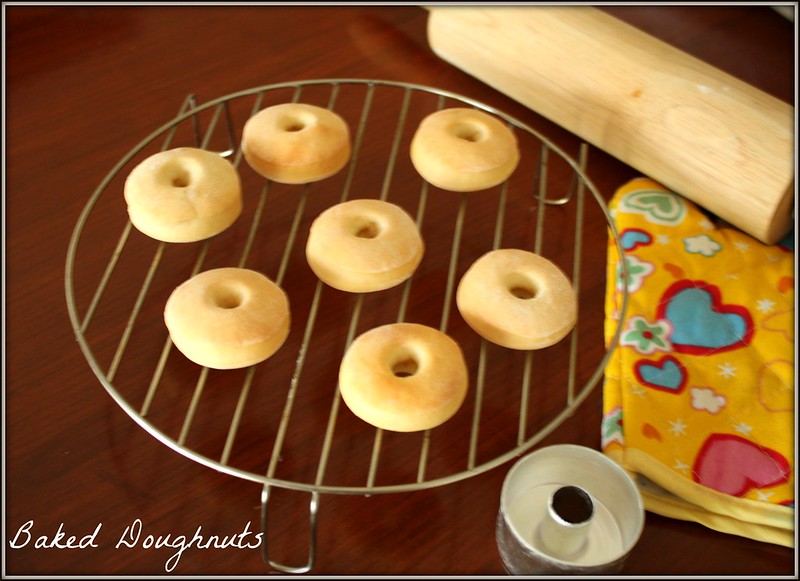
The sponge (my very first) turned out really nice, though I was quite worried if it would be too eggy. But it tasted just fine. The chocolate icing was delicious and the dessicated coconut with the chocolate was such a lovely combination - something I tried for the first time.
The process of dipping the cake in chocolate and then coating it with coconut flakes took a little longer than I expected. My little son was so eager to eat it at every stage, so a couple of pieces vanished in the process of testing and tasting.

Give this a try, its really delicious and was a big hit with my friends and family. If you are feeling a little lazy, use store bought sponge cake, and save up on that much time.

Lamingtons
(makes about 16)
Recipe Source - David Lebovitz.com

What you need -

Spongecake -

6 eggs (room temperature)
1 1/3 cup cake flour*
3/4 cup sugar
1/4 teaspoon salt
1 teaspoon vanilla extract
1/3 cup melted unsalted butter

*Cake Flour - Used the tip from Smitten Kitchen to make the cake flour - for every cup of regular flour, add 2 tbsp of cornflour / cornstarch and sift together twice. Measure out the cake flour from this.

Chocolate Icing -

1/2 cup semisweet chocolate, chopped
3 tbsp unsalted butter
3/4 cup milk
2 cups powdered sugar
2 tbsp unsweetened cocoa powder (I used Morde)
2 tbsp boiling water
3 cups unsweetened shredded coconut

What you do with it -

Spongecake -

Grease a 9" square pan and line the bottom with parchment paper
Preheat the oven to 180 C (350 F)
Beat the eggs and granulated sugar and salt on high speed for five to ten minutes, until thick. Stir in the vanilla.
Use a mesh strainer and sift the flour over the beaten eggs, and simultaneously fold in the flour, using a whisk. I used a large spoon instead of a whisk
Fold in the melted butter gently, taking care not to overfold
Scrape the batter into the prepared pan and bake for 30 minutes, or until the cake begins to pull away from the sides of the pan
Remove from oven and allow to cool
When the cake has cooled down completely, gently remove the sponge cake onto a cutting board. Remove the parchment paper
Cut into two rectangles and then cut each into half horizontally

Chocolate Icing -

Mix the chopped chocolate, butter and milk in a heatproof bowl. Hold it over a pan of simmering water and mix well till its smooth. Take it off the heat and then add the powdered sugar and cocoa powder.
Spread about half a cup of the chocolate icing over one layer of the spongecake, then top with the other half of the spongecake, sandwiching the two together with chocolate icing in the middle
Cut the cakes into sixteen squares
Whisk two tablespoons of boiling water into the icing. Put the coconut flakes into a shallow bowl.
Use your hands to dip the Lamingtons into the chocolate, rolling them around to make sure each side is coated with the chocolate icing.
Then roll the chocolate coated pieces in the coconut flakes, so its coated well on all sides
Once all the pieces are coated with chocolate and tossed in coconut, place the Lamingtons on a wire cooling rack and let stand until the icing firms up a bit

Tuesday, July 10, 2012

Pumpkin Raita

Its almost a routine on most days to go thru various blogs, get carried away by beautiful pictures of some amazing looking food, visit more blogs, drool some more, get all inspired to cook and then realise that I have some really boring vegetables stocked up.

pumpkin raita

This happened again a couple of days back and I had about an half an hour before I needed to get lunch ready, and all I had was half a pumpkin and potatoes ! I was too lazy to drive out, so just had to make do with what I had on hand.
Sometimes, I wish I had those beautiful refrigerators that they show in the TV ads. Its stocked with all sorts of fruits and vegetables and some delicious looking desserts

It was a terribly hot and humid day, so decided on some rotis, potato sabji and pumpkin raita.
This is a really simple raita, high in dietary fiber, Vitamin A, Vitamin C and zero cholesterol.

What you need -

2 cups cubed red pumpkin
1 1/2 cup curd / plain yoghurt
1/2 tsp roasted cumin powder
1/4 tsp red chilli powder (optional)
1/4 tsp salt
1 tsp coriander leaves

What you do with it -

Take the skin off the pumpkin and cook / steam the pumpkin pieces, without any water
In a bowl, add the curd and salt and beat well
Add the boiled / steamed pumpkin and mash it well to blend with the yoghurt
Sprinkle the cumin powder and chilli powder and garnish with coriander leaves

Wednesday, July 4, 2012

Walnut and Fig Loaf


There's an eternal fight for the TV remote at home - I'm not a part of it though, I gave up long ago. TH and my son are the warriors here and I just sit thru the endless news channels or the cartoon ones, depending on who won !
Ever since Masterchef Australia started screening here, we have peaceful TV viewing time. The little fellow is hooked on to it and has his favourites in each series, TH loves anything to do with food and I am more than happy to sit and watch something of my interest.

walnutfigloaftitle

When I saw Phillippa Grogan teach this walnut and fig loaf at the Masterclass, I was really tempted to try it. I don't have a regular oven, I just use the convection mode of my microwave to bake, and its been okay so far, but I never get that lovely browning when I bake bread. I decided to give this a shot anyway. I had a lot of figs (dried) and walnuts at home, so this was my afternoon experiment yesterday.

The browning was definitely not enough, but I did land up with a chewy crust. I used the tip of placing ice cubes in a try below. I placed a small ovensafe bowl with ice cubes under the baking rack.

I pretty much followed the recipe, (though that's asking for too much with me, I seem to have a problem sticking to measurements and following recipes to the exact detail) but I goofed up in a couple of places, though it wasn't disastrous

I landed up using extra wheat flour, since the dough got a bit too sticky (I'm guessing the water was little too much) and I needed the flour to get it into some shape. The bread was a slightly dense, or maybe I expected it to be lighter, but the figs in it tasted really nice.

The other mistake I made was that I put it in a plate with semolina during the first proofing (I just didn't read the recipe right) and so when I had to punch it back the next couple of times, the semolina got added into the dough. It wasn't such a bad idea after all, the coarse grains added a bit to the texture of the crust, but you may not want to do that.

I used APF / maida for the white unbleached flour in the recipe. The pre-heating is way faster in a microwave, so the one-hour of pre-heating did not happen, neither could I leave the door partially open in the last five mins

Other than that, it turned out to be a nice loaf. We had it for breakfast again this morning, some slices with cheese, some with honey and butter and another with orange marmalade. Tasted lovely. Thank you Phillippa.
Head over to the recipe here.

This is being Yeastspotted and sent to Let's Cook #17 - Breads at Ticking Palates

Monday, July 2, 2012

Cream scones

This is not exactly a 'guest' post, its a post by my  little not-so-little-anymore cousin. She was a little baby when her family moved to Bangalore and perhaps the first child I handled. She is a beautiful young lady now, who had the most wonderful wedding last year. Time flies so fast !
She made these cream scones and told me about it and I can't tell you how nice it felt when she said I had inspired her to get into the kitchen. She's really good for my ego :)
I told her I'd love to put it up on my blog and she sent me this...Thank you dear Ina !

~

Let me begin by telling you that I am Arch’s cousin and the one for whom she created the “simple recipes” tag on this blog. I can’t remember now whether she made it for me while I was still away in New York at graduate school or in August last year when I came back home and got married because, truthfully, it was only when she came home this summer and we spent many afternoons chatting and eating delicious things together that I suddenly felt like making something myself.

cream scones

Inspired by Arch, with wonderful recipes adapted from the Yum Factor, and much help from my husband, I cooked my mother and my mother-in-law a special Mother’s Day lunch: Carrot Ginger Soup, Tomato Avocado Bruschetta, Basil Almond Pesto Penne, and an Eggless Chocolate Cake. Everyone loved it, my mother-in-law couldn’t stop saying how good everything tasted, and I think my mother thought it was the best Mother’s Day gift in the whole wide world.

We ourselves really enjoyed cooking up something delicious together on a Sunday morning. A few times before this, my husband had made nice and crisp dosas for breakfast. Or I’d tossed up an interesting salad for brunch. But, now that we’d begun to expand our repertoire of recipes, we decided to move on to things we’d been craving. We both missed waffles from the yellow waffle truck in New York that parked itself outside Columbia University’s gates on Mondays, so we made waffles.

cream scones with nutella

Sipping tea on a breezy Bangalore evening last weekend, I suddenly wished for scones, looked up the recipe here at JoyofBaking.com and made sure we had everything we needed, and, voila, we had tea and scones fresh out of the oven!
What a wonderful feeling to enter the kitchen with an idea and leave with something delicious that you almost magically made. At least that’s how cooking still seems to us at the moment, a bit magical. Thank you, Arch, for sprinkling your fairy dust on us!

Cream Scones
Recipe Source - JoyofBaking.com

Ingredients –
2 cups all purpose flour
1/4 cup granulated white sugar
2 teaspoons baking powder
1/4 teaspoon salt
1/3 cup cold unsalted butter, cut into pieces
1 large egg, lightly beaten
1 teaspoon pure vanilla extract
1/2 cup milk
cream, for glaze

Instructions –

Preheat the oven to 190 C and grease a large baking tray with butter.
In a large bowl, whisk together the flour, sugar, baking powder, and salt.
Blend the pieces of butter into the flour mixture with your fingertips.
In a small cup, whisk together the beaten egg, vanilla extract, and milk.
Add this mixture to the flour mixture and stir until just combined.
Transfer to a lightly floured surface and knead the dough gently 4-5 times.
Make the dough into rounds (about 10-12) and place them on the baking tray.
Brush the tops of the scones with a little cream to help them brown nicely.
Bake for 15 to 20 minutes or until nicely browned and test with a toothpick.
Serve warm with softly whipped cream, your favorite jam, or even Nutella.

LinkWithin

Related Posts Widget for Blogs by LinkWithin